Labels

9.15.2011

OMUSUBI (ONIGIRI) Rice Ball ただのおにぎり

Have you ever watched Japanese cartoon movie 「Spirited Away」?
I like that movie. If you have watched it,  you have seen a girl 'Chihiro' was eating riceball.
that is 'ONIGIRI / OMUSUBI'!
I like that scene, and  I can't stop crying everytime  I watch it. 
Why Chihiro starts crying just after she ate Onigiri?
I think, because Onigiri is Japanese soul food,comfort food, traditional food and We are so familiar with Onigiri. So, she was relieved at the Onigiri. I understand her. that's the way it is!


So, I would love to share the Simple Onigiri recipe, sincerely. 
It's very simple. and soo easy!

*Ingredients* 3 serving
3 cup steamed Japanese rice or Sushi rice
salt to taste
strips of dried NORI seaweed

(filling)
UMEBOSHI pickled plum
grilled salted salmon

*Directions*
1. place cooked rice in a bowl, sprinkle salt, and fold.

2. Place a third of rice on a plastic wrap, then form into triangle or a ball with your both palms and pressing gently lightly.


3. Off the Plastic wrap. then, Wrap the riceball with a strip of NORI seaweed if you like.
simple one!

4. If you want to put UMEBOSHI in, Remove the seed. Place a third of rice on a plastic wrap, then make a dent in the middle of rice, then put UMEBOSHI in the dent. Form into triangle or a ball with your both palms and pressing gently lightly. off the Plastic wrap.
UMEBOSHI (pickled plum)!
5. If you want to mix filling in a rice,  Pick off the fresh of a grilled salmon, add salmon in a rice. Place a third of salmon mixed rice on a plastic wrap, then form into triangle or a ball with your both palms and pressing gently lightly. off the Plastic wrao.


ahh!I'm hungry!

You can mix Sesame, or sprikle the Rice seasoning, or put KATSUOBUSHI(bonito flakes) seasoned with soy sauce for filling.

If it's too difficult to make triangle shape, don't worry you can make a round shape, and it's so fine!

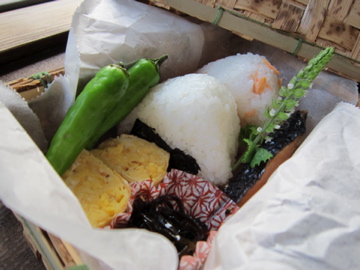
Onigiri is good for breakfast, lunch, and lunch box too.
I like this bamboo lunch box! 

Tada~!!!

Enjoy!!!

Onigiri

9.04.2011

お抹茶のクレームブリュレ Green Tea MATCHA Creme Brulee

I made Green tea MATCHA creme brulee today.


It has only simple ingredients, but soooooo good!
This is great surprise to me!!!
It will be your favorite home made dessert. Try it out☆

Green Tea Creme Brulee  (6 serving)    **1 cup=240ml
*Ingredients*
2 tsp Green Tea MATCHA powder
1 tbsp Hot water
200ml (1/2 cup and 1/3 cup) Heavy cream
125ml (1/2 cup) Unsweetened Soy milk, or Milk
3 tbsp granulated sugar
3 yolks
(for caramelize)
6 tbsp granulated sugar

*Directions*
1. Preheat oven to 300F. Prepare boil water for water bath.

water bath.

2. Add Hot water slowly to Matcha Green Tea powder. Mix well.

3. Pour heavy cream and soy milk in a milk pan, and stir over low heat until it almost comes boil. Remove from the heat, set aside.

4. In a bowl, Whisk together Egg yolks until it starts to thick, Add Green Tea mixture. and mix.


5. Add Heavy cream mixture gradually into the egg yolk mixture. stirring continually and gently.

6. Strain the mixture through a strainer, pour into 6 small ramekins. Bake in a water bath for 20 minutes.
Strain.
7. Remove from the oven, and cool to room temperature. Refrigerate for 2 hours, or more.


8. Spread 1 tbsp granulated sugar on top for each 6 ramekins. Using a torch, Melt a sugar until the tops are caramelized. Be careful as not to burn. Cool to room temperature, Refrigerate for about 15 minutes.


Yum! Yum!

*If you don't have a torch, then use a disused spoon. Heat a Spoon over a flame, and Press a spoon against sugar. It's like a Spoon Iron! I did it for yellow bowl creme brulee. and I felt Spoon is better than torch! but, It's kind of dangerous... So, Please do not burn yourself! OK?


お抹茶のブリュレを作ってみましたよー!
ちょい焦げたけど、ま、いいかー!

濃厚なプリンを作るみたいな要領でできるのでメチャメチャ簡単。作ってみてちょいとビックリしてしまいました!
中はとろとろ、外はキャラメルがカーリカリ☆
プリンよりもっとクリーミーな感じ!

正直言って、でっかい器に作って全部一人で食べたいくらい美味しい。あ、でも太る?
豆乳で作ってみたので多少はヘルシーかしら?
お抹茶好きの私にはたまらん味ですぜ〜。お試しあれ〜。


抹茶ブリュレ 
*材料* ココット6個分
お抹茶 小さじ2
お湯 大さじ1
生クリーム 1カップ
豆乳(または牛乳) 125ml
グラニュー糖 大さじ3
卵黄 3個

(キャラメリゼ用)
グラニュー糖 大さじ6

*作り方*
1. オーブンを150度に予熱する。天板にお湯をはっておく。
2. お抹茶にお湯を加え、ダマがなくなるようしっかり溶かす。
3. 生クリームと豆乳を弱火で温める。(沸騰させない。)
4. 卵黄とグラニュー糖をボールに入れ、しっかり混ぜておく。ここに、溶かした抹茶も入れてよく混ぜる。
5. 卵液に、温めた3'の生クリーム液を少しずつ加え、静かに混ぜる。
6. 細かい目の漉し器で漉してからココットに入れて、予熱しておいたオーブンで20分蒸し焼きする。
7. 焼けてあら熱が取れたら、冷蔵庫で2時間くらい冷やす。
8. よく冷えたら、グラニュー糖を各ココットに大さじ1ずつふりかけて、表面をバーナーでキャラメル色になるまであぶる。あら熱が取れたら、冷蔵庫に入れて15分程冷やしてできあがり!
器によって雰囲気も変わりますねぇ。
バーナーがない場合、古いスプーンを火でしっかりあぶって、表面の砂糖にジュジューっと押し当てるとキャラメル状になります。スプーンはものすごく熱くなるので、火傷には充分注意して下さいね!


8.24.2011

バナナとキャラメルナッツのスコップケーキ! Banana and caramel nuts cake

I suddenly felt the need to eat something sweets, then I decided to make 'Scoop Cake'.
Do you have any idea what is the Scoop Cake?
Scoop cake is a layer cake which in the casserole dish like a tiramisu.
We, Japanese people call it scoop cake, because when you serve, you do 'scoop' it.


It's easy to make since you don't have to decorate with whipped cream on the top of a cake.

Here's the recipe!
*note* 1 cup=240ml=american size measure cup


*Ingredients*

:syrup for cake:
50g (about 1/4 cup) granulated sugar
100ml (about 1/2 cup) water
2 tsp Grand Marnier


:Cake 9.5 inch × 11 inch square pan:
3 egg (room temperature)
70g (1/4 and 1/3 cup) cake flour
70g (1/3 cup) granulated sugar
2 tbsp milk

:Whipped cream:
200ml (6 and 4/5 oz) heavy cream
3 tbsp granulated sugar

:caramel nuts for topping:
1 tbsp unsalted butter
2 tbsp granulareted sugar
1 tbsp water
30g (3 tbsp) mixed nuts

*Directions*
Preparation:
Preheat oven to 360F
Place parchment paper on a square pan
Make a syrup for a cake. In milk pan, melt sugar in water over low heat. when it cool, add Grand Marnier.

1. In a milk pan, put sugar and butter and water over low heat, when it turns caramel color. turn off the heat. add nuts. spread on a parchment paper. Let it cool. when it get rock solid, chop it!
bubble bubble.
caramel nuts!
2. In a big bowl. Combine egg and sugar, beat it with a electric mixer until dense foam.
about 4 minutes.

3. Fold sifted flour with a spatula 1/3 at a time until it get smoothly.

4. Add milk. and Gently mix.
5. pour the batter into the pan, Lift and drop the pan on the counter to pop the air bubbles.

6. Bake for 10 minutes.
7. Remove from the oven, upside down onto parchment paper. Let it cool.

8. Add sugar to heavy cream, then Whip it. Slice Banana.
9. Cut sponge cake and place in a dish, Brush syrup on the cake. cover the cake with a whipped cream then place banana. Repeat layers, scatter caramel nuts on the top.
cake~syrup~whipped cream 

banana
”Hey, Bring me to the party!” yes, it's good for pot luck party!

Or, you can layer them like this. It's looks good too!
with chocolate sauce!!! happy!


突然ケーキが食べたくなって、スコップケーキを作りました。

苺は今の時期ちょいとお高いし、うーん何のケーキにしようかなーと思いながらスーパーをうろうろ。
おう!バナナがあった!
いつでもあって間違いなく美味しいわよね。
丸ごとバナナとかさ、バナナのクレープとかさ、シンプルでとても美味しい。申年だからか(あ、歳がバレた!?)、私バナナが好きです。
ナッツにキャラメルを絡めたものをトッピングすると、カリカリしてて美味しいんですのー。
スポンジも試作をしてふわんふわんに仕上がりました。
ガラスの深めの皿に作ってもよし。

可愛い型でくり抜いて重ねるもよし。
with チョコソース!ぐはぁ!うまい!
ギフト用に空き瓶につめてもよし。


色々と試してみました。
クリームと馴染んでしっとりと美味しいのはスコップのかな?
でも、型でくり抜いて重ねたやつは、見た目が可愛くてちょっとよそいきっぽくていいよね。
生地も二度試作して、なかなかふわふわのいい生地が焼けましたよ〜。
レシピはこちら!

*材料*
<スポンジ生地>
薄力粉 70g
グラニュー糖 70g
卵(常温) 3個
牛乳(常温)大さじ2

<スポンジ生地用シロップ>
グラニュー糖50g
水 100cc
グランマニエ 小さじ2

<クリーム>
生クリーム 200cc
グラニュー糖 大さじ3

<トッピング>
バター10g
グラニュー糖 大さじ2
水 大さじ1
ナッツ 30g
バナナ3本

*作り方*
下準備:
180度にオーブンを予熱しておく。
24cm × 28cmの天板に、オーブンシートを敷いておく。
スポンジ生地に塗るシロップを作っておく。水とグラニュー糖を火にかけ、グラニュー糖が溶けたら火を止める。冷えたらグランマニエを加えておく。

1. バターとグラニュー糖と水を小鍋に入れて弱火にかけ、キャラメル色になったら火を止めて、ナッツと絡ませ、オーブンシートの上に広げておく。固まったら、包丁で刻んでおく。

2. 大きめのボウルに卵を割り入れほぐし混ぜたら、電動ミキサーの高速で約4分程泡立てる。

3. スパチュラに持ち替えて、ふるいにかけた薄力粉を2~3度に分けて加え、さっくり混ぜる。
4. 牛乳を加え、静かにふんわり混ぜ合わせる。
5. 天板に生地を流し、高いところから天板ごと落として気泡を抜く。
6. 180度に予熱しておいたオーブンで約10分焼く。

7. 焼けたら、天板ごと裏返しあら熱をとる。

8. 生クリームにグラニュー糖を加え、泡立てる。バナナを輪切りにする。

9. 適当なサイズに切った生地を、ガラスの器に敷き、シロップをハケで塗る。生クリームをスポンジ生地の上にのばし、バナナを並べる。

スポンジ生地をその上に重ね、シロップを塗り、生クリームをのばし、バナナを並べる。飾りにトッピング用のキャラメルナッツを散らす。

できあがり〜!

説明が多いので、難しそうに感じられるかもしれませんが、全然簡単です!ロールケーキなどを焼いたことのある方ならすぐできます。巻くんじゃなくて重ねるというだけの違いです!

食べる際に、チョコシロップやキャラメルシロップをかけても美味しいですよー☆お試しあれ〜。

Labels

Japan (140) Sweets (112) for kids (73) cook in the american style (69) column (51) 日本語 (48) America (41) chocolate (38) vegetable (37) fruits (32) diet (27) easy (27) healthy (25) meat (24) Breakfast (22) Egg (20) dessert (20) tea (20) travel (20) snack (19) item (17) Idea (16) Tofu (16) Bread (14) spring (14) rice (13) spice (12) the basics (12) Event (11) press (9) Sauce (8) Soy Milk (8) bento (6) summer (6) Autumn (5) 郷土料理 (5) Movie (4) book (4) Bake shop (3) Seafood (3) Test (3) kagawa (3) noodle (3) plant (3) introduction (2) peanut butter (2) tokyo days (2) trip (2) 海外バズりレシピ (2) Recipe review (1) a (1) fish (1)